How do you create an International Order?
This document is a comprehensive guide to how you can create an international order through the iThink Logistics website. It will give you step-by-step instructions and help you out with the entire process of creating an international order.
How do you navigate to the Create Order section?
- First and foremost, log in to your iThink Logistics account using your credentials
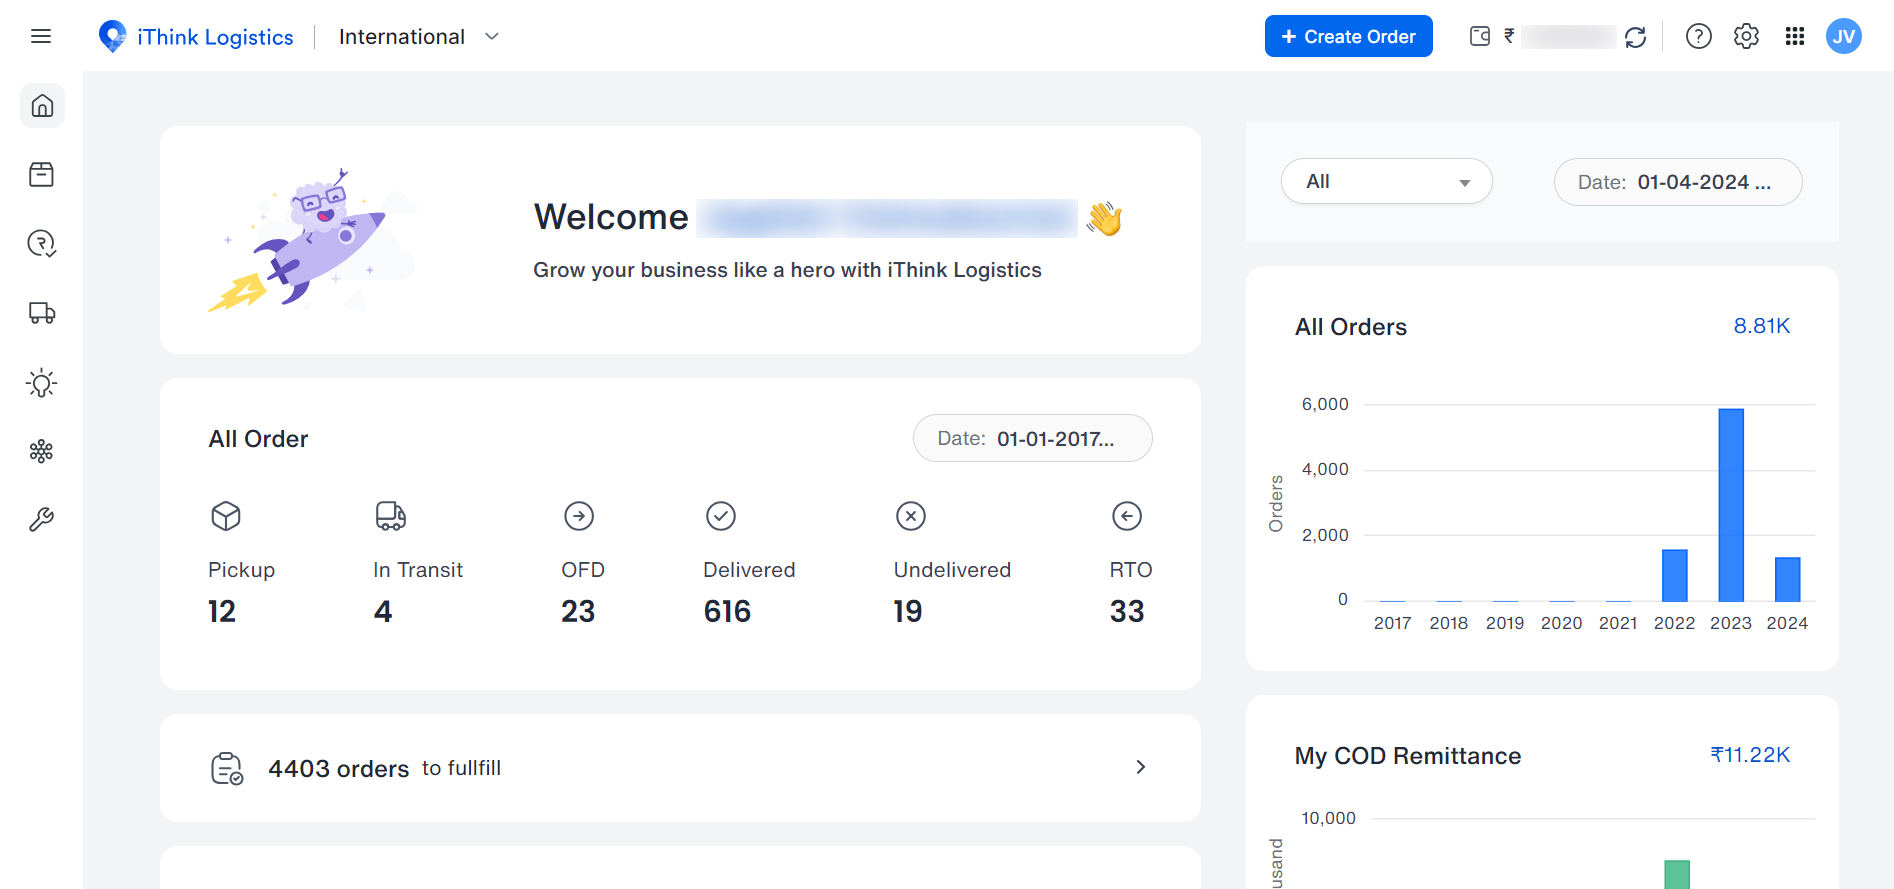
- After you have logged in, you will be redirected to The iThink Logistics Dashboard which can be seen in the image below.
- There are two methods by which you can navigate to the ‘Create Order’ section on the website
Navigation Method A: Create an order by using the menu situated on the left side of the dashboard
All you have to do to locate ‘Create Order’ on the iThink Logistics website is follow the steps below:
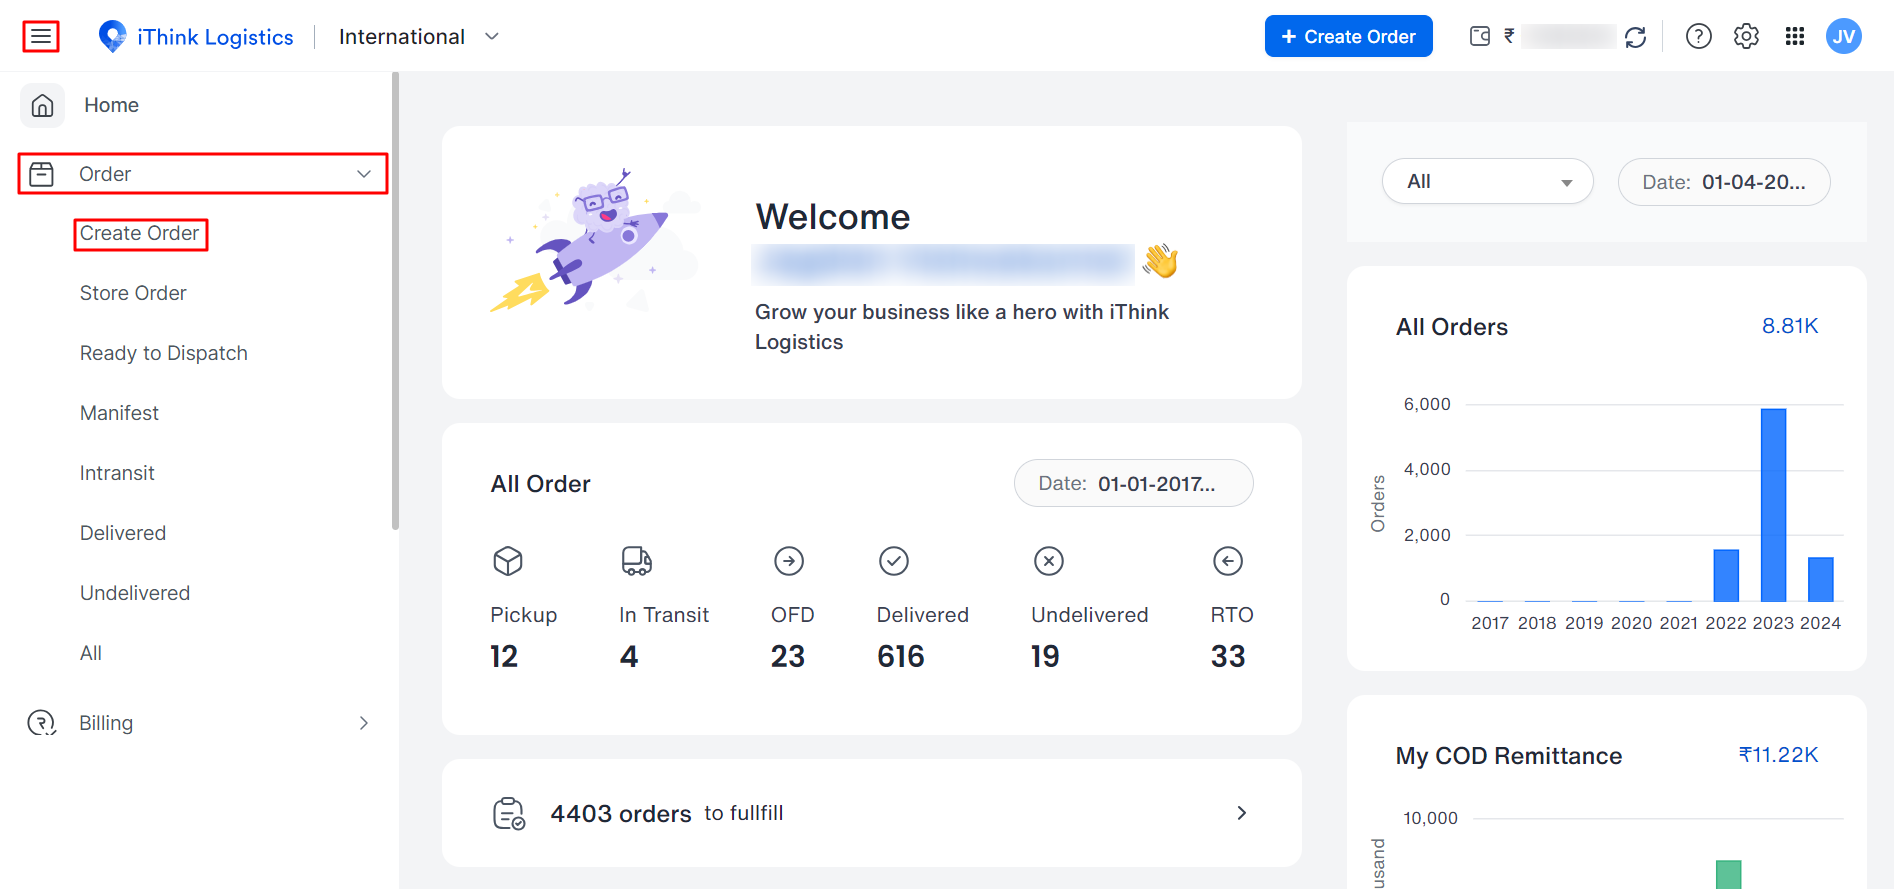
- Select the menu option located on the top left side of the website interface, represented by the three horizontal lines
- Click on the menu item called ‘Order’
- There will be a drop down list that will appear with several options
- To create an order, select the first option, which will be ‘Create Order’
Navigation Method B: Create an order directly using the ‘Create Order’ button
- On the dashboard, you will find a button in the header named “Create Order.”
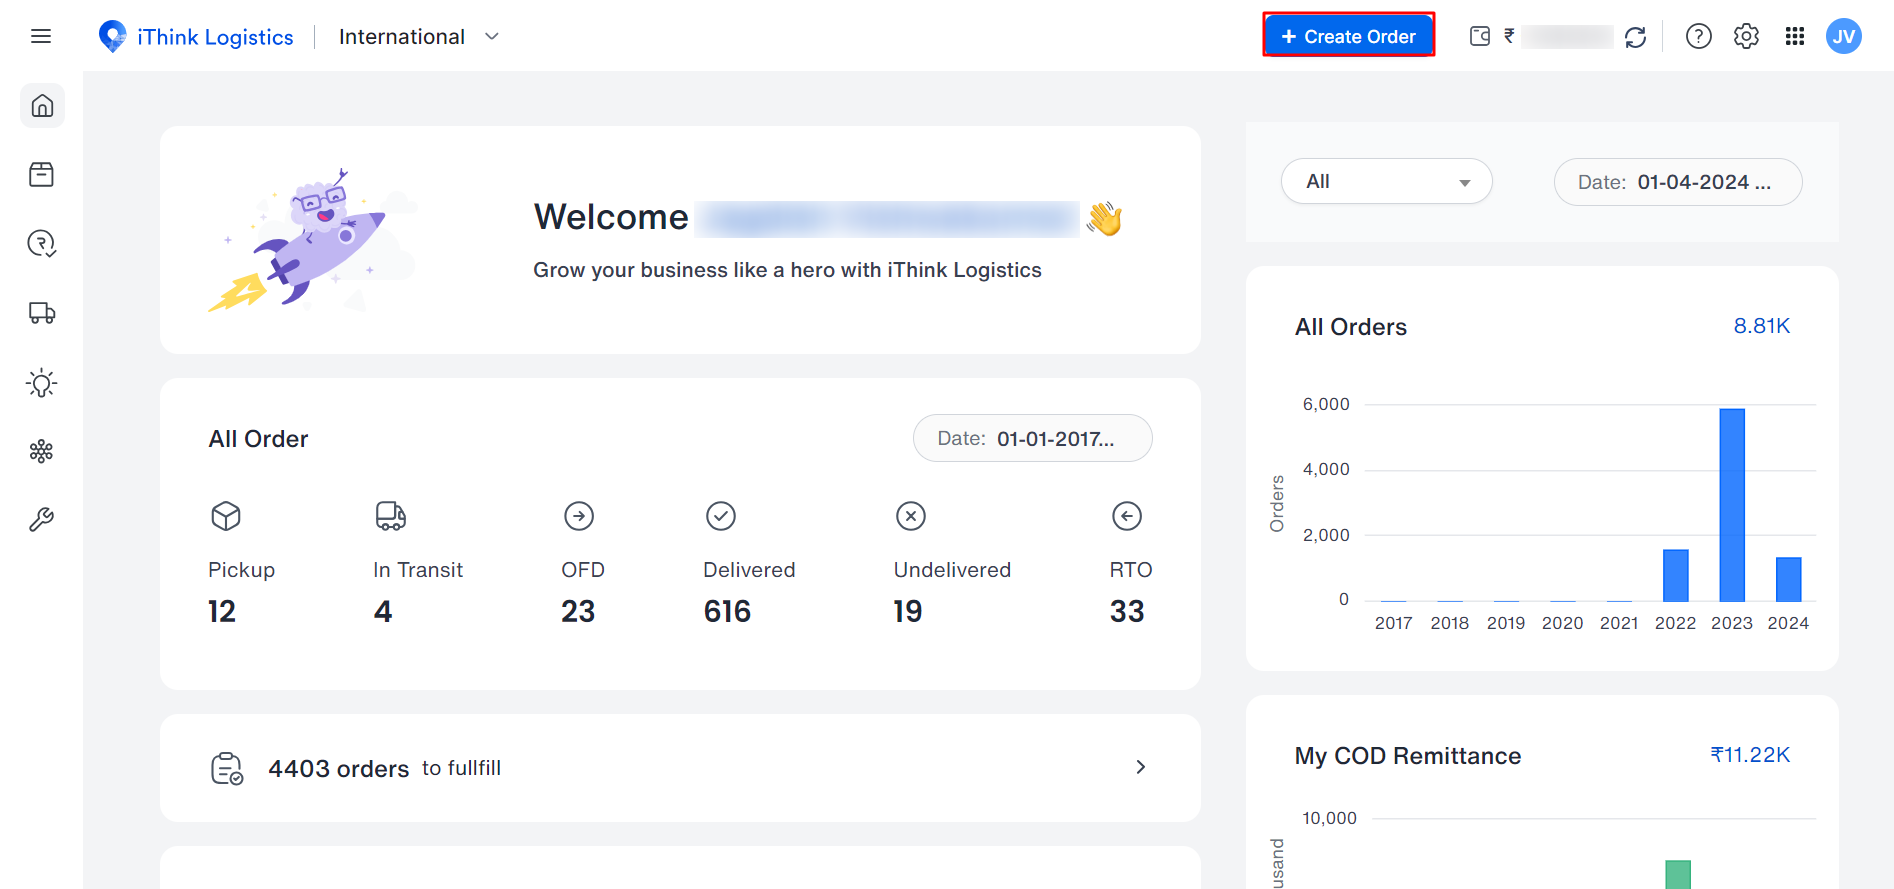
- After clicking Create Order, you will be redirected to a screen that will allow you to create your order
How to fill out the details in the ‘Order Info’ section of the Create Order Screen:
- Warehouse Address: You can select an address from the warehouse dropdown. This address is the pickup address for the order and is fetched from the pickup address or warehouse address configured previously in your account settings
- Order ID: The Order ID refers to the Unique ID of the order that you can enter
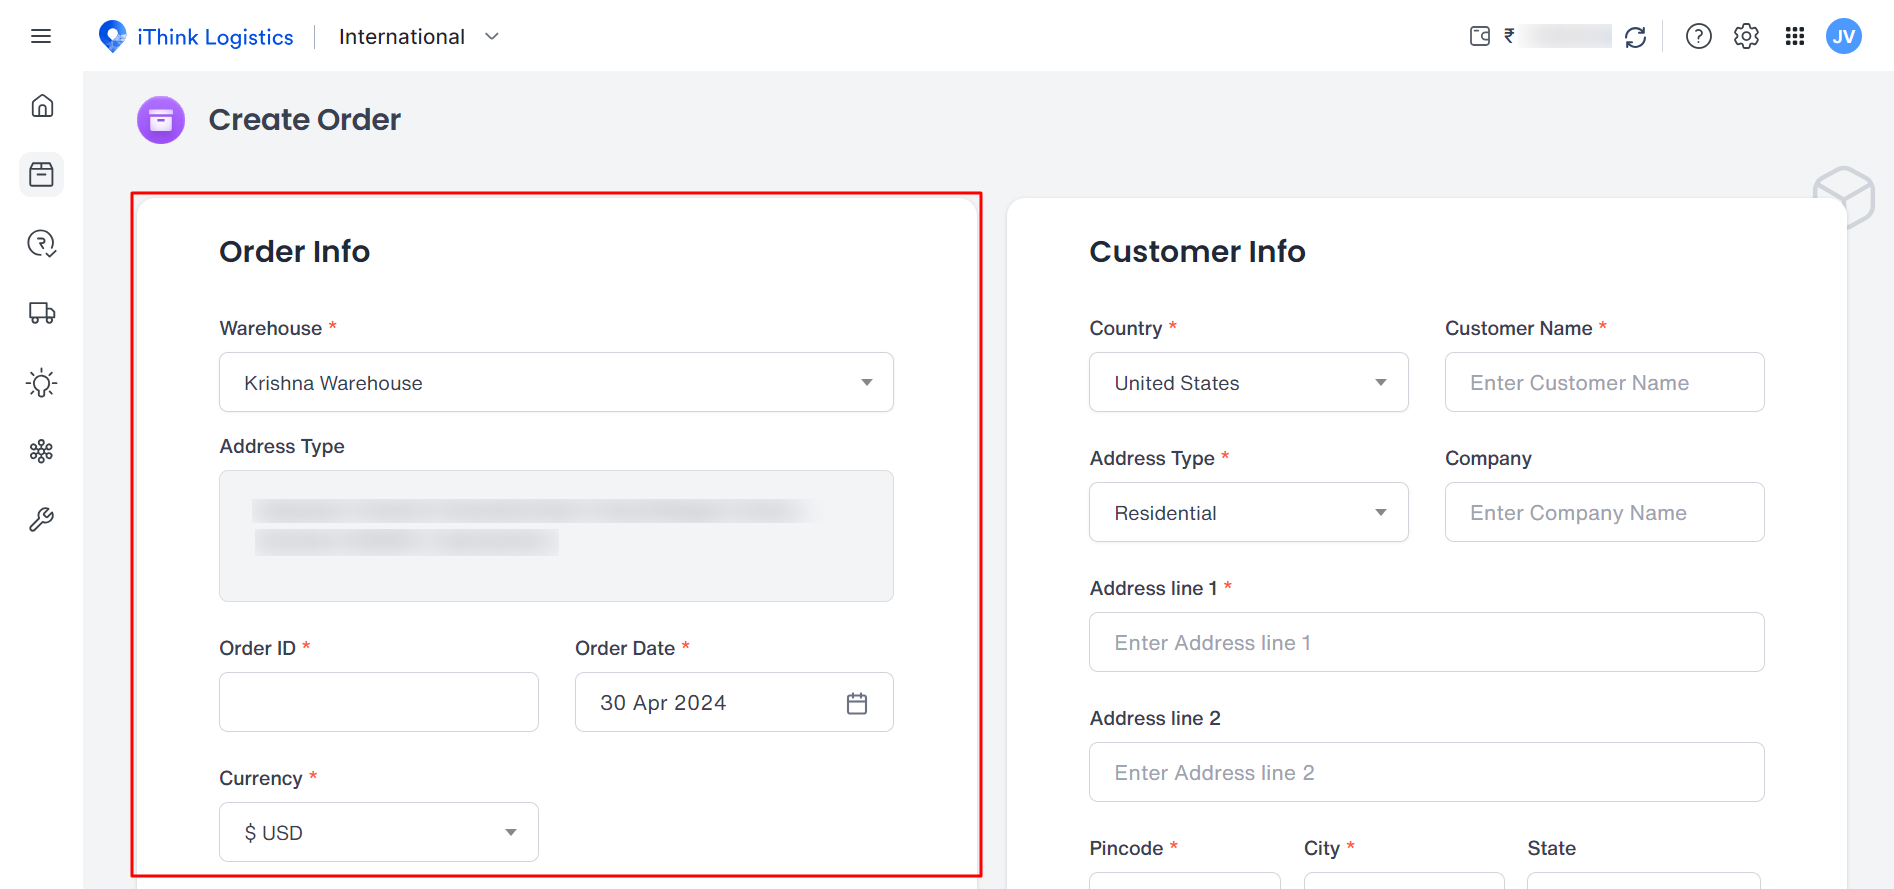
- Order date: This section specifies the date of the order
Note: The date that you enter here should not be a future date
- Currency: Select the corresponding currency from the drop down depending on the country you want to ship the order to. You will be able to select any currency from the drop down.
How to fill out the details in the ‘Customer Info’ section of the Create Order Screen:
- Country: Here, you will be able to select the customer’s country from the drop down where the order needs to be delivered.
- Customer Name: This is where you can write the customer’s name on the field.
- Address Type: From the address type drop down, you can select the nature of the address, such as Business or Residential. If the type of address you choose is ‘Business’, then it is mandatory to fill out the ‘Company Name’ field. However, this is not mandatory if the type of address selected is ‘Residential’
- Company: Enter the company name, which will be the customer to whom the order is being sent
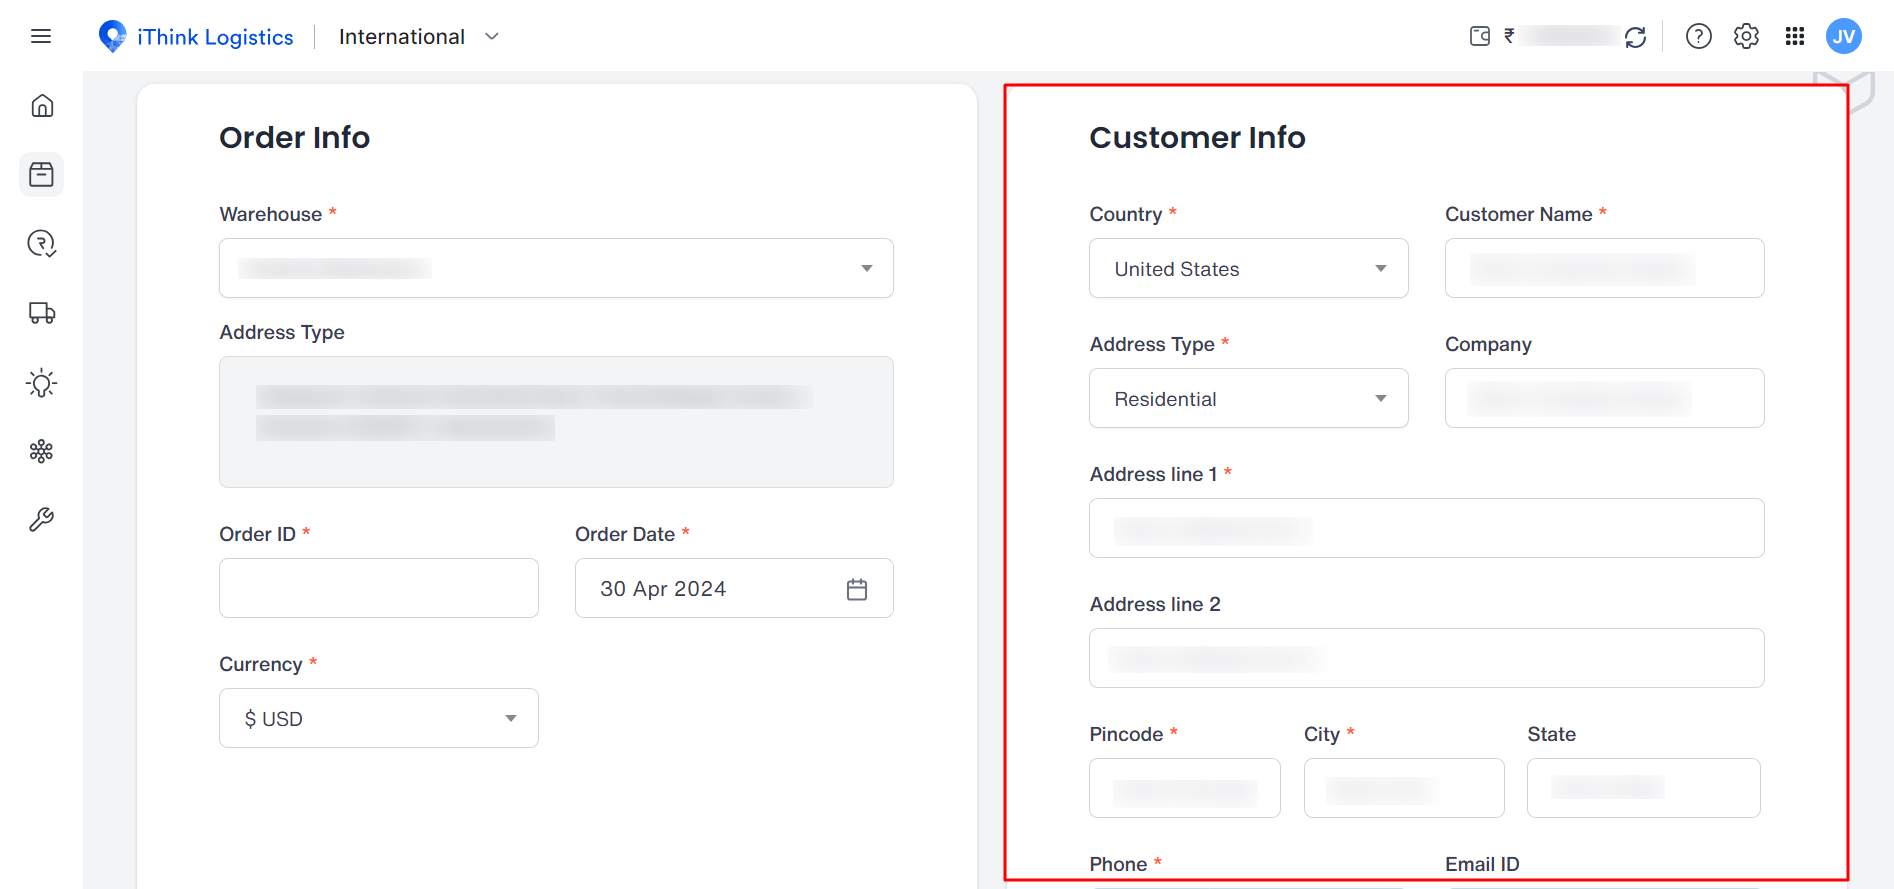
- Address Line 1: Provide the customer's address where the shipment has to be delivered.
- Address Line 2: This field is optional. Kindly enter the complete address of the customer.
- Pincode: Enter the postal code corresponding to the selected country and city. If an incorrect pincode is entered that does not match the country, an error message will be displayed.
- City: The city and state names will be automatically populated based on the provided pincode.
- State: The state will be automatically determined based on the provided pincode.
- Phone: The mobile number country code will be determined based on the selected country.
How to fill out the details in the ‘Packages’ section:
- Item Name: Enter the product name that you want to ship
- Quantity: Enter the Number of products that you will be shipping to the customer
- Item value: Enter the value/worth of the product(s) that you will be shipping to the customer
- SKU (stock-keeping unit): Enter the product's SKU. The SKU is a unique code that a seller will assign to every type of item that they sell.
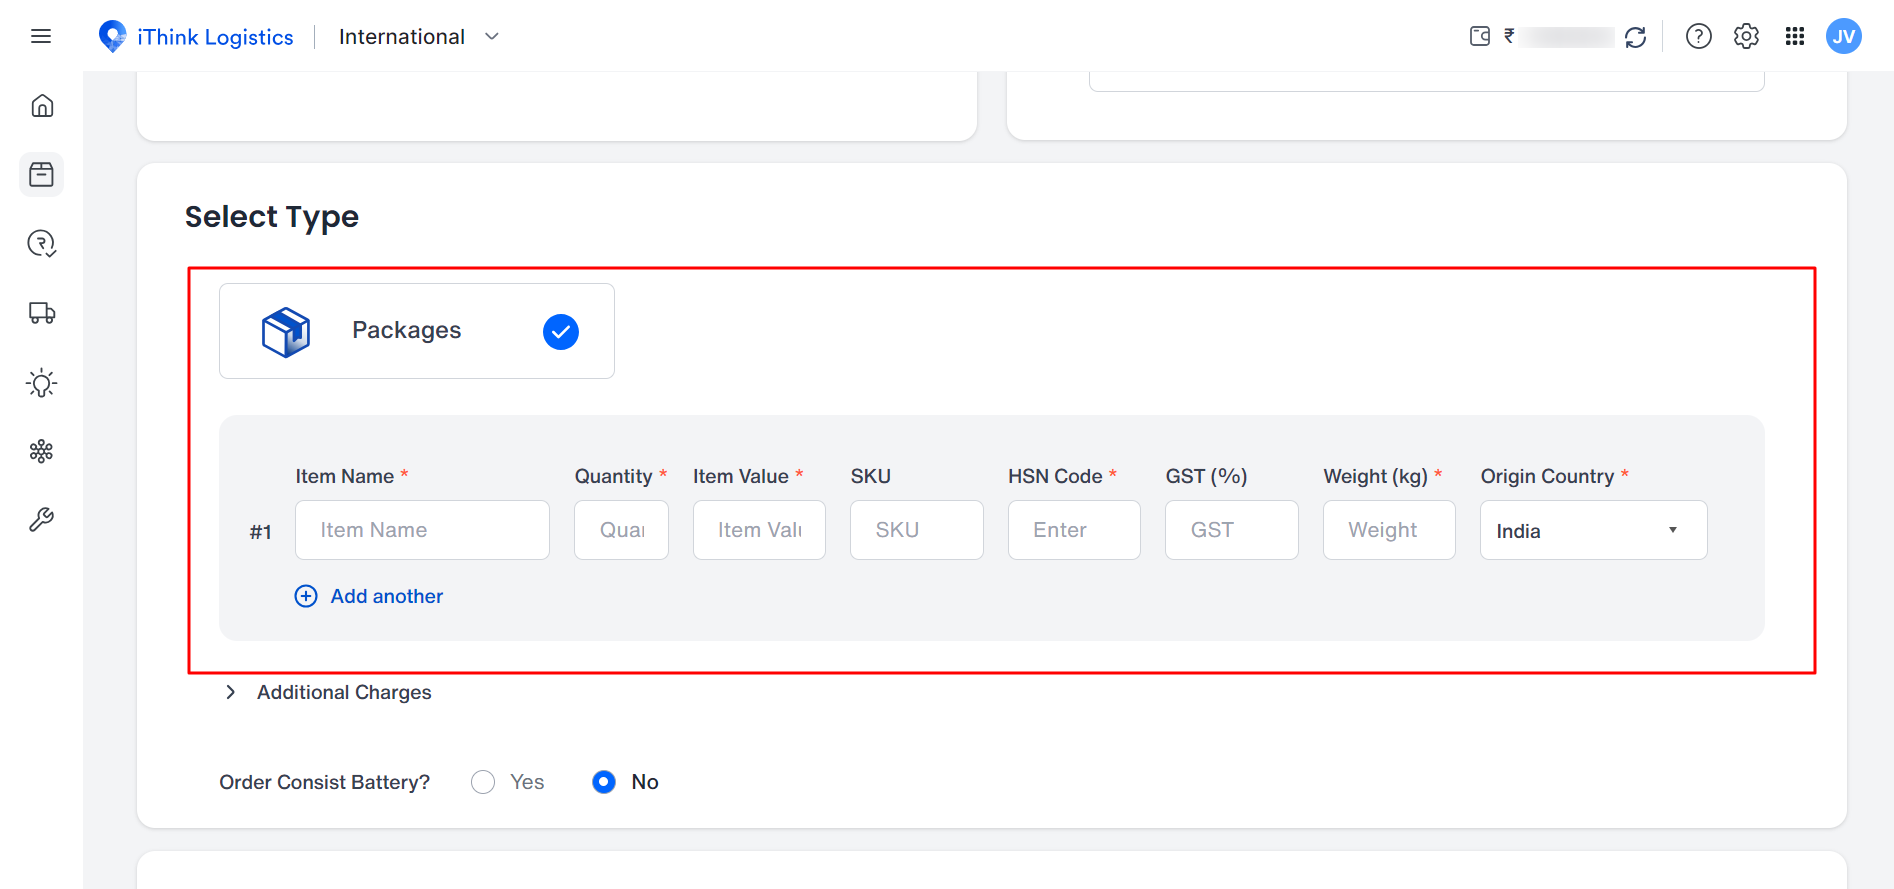
- HSN Code: The HSN code will be based on the product name that you enter. It must be a minimum of 8 characters.
- Weight: Enter the weight of the product(s) that you will be shipping to the customer
- Origin Country: Select the name of the country of the product origin. For example, some sellers import their products from China and then sell internationally, so the product origin in this case would be China.
- Add another: Below the details, there is an icon labelled ‘Add another’. If you want to add more than one product with a different SKU, click Add another.
How to fill out the details in the ‘Additional Charges’ section:
You should know that these charges are optional. If you need to add any additional charges, you will be able to click on them individually. You can see the charges fields, which have been explained below.
- VAT Charges/Fee/Cost: This is the Value Added Tax which you can add. It will be a consumption tax on goods and services.
- Fuel Surcharge: Add the cost in the Fuel surcharge. You pay this transaction charge along with the actual charge at any petrol pump.
- Reverse charges: Here, you can add the Reverse charges. A reverse charge is a liability to pay tax on the recipient of the supply of goods that have been shipped. To simplify, it is the charge that the customer must pay if they incur any shipping costs.
- Handling Charge/Fee: Enter the Handling charge.
It is an amount charged to customers on top of their order subtotal and shipping fees if required by you.
- Freight/Shipping Charges: This refers to the amount paid to a carrier company for transporting goods from the point of origin to the agreed location.

- Insurance Cost (Fee): Here, you can add the Insurance cost. It is an additional charge that will ensure the safety of the product.
- Export Charge: Add the Export charge, which is the fee payable for the export of the particular goods
- Other Charges: Enter the cost of charges other than the ones specified, if any
- Order Consist Battery: Select the ‘Yes’ button if any added product contains a battery. If not, then select the ‘No’ button. For example, if the product is a portable speaker, it will have a battery in which case you have to select the ‘Yes’ button
How to fill out the details in the ‘Package Dimension’ section of the Create Order Screen:
- Length x Width x Height (cm): Enter the package dimensions in Length, Width and Height with the unit of measurement being centimetres
- Calculate the weight of the product depending on L*W*H
Note: Please ensure that the total product weight is the same as the package dimension weight

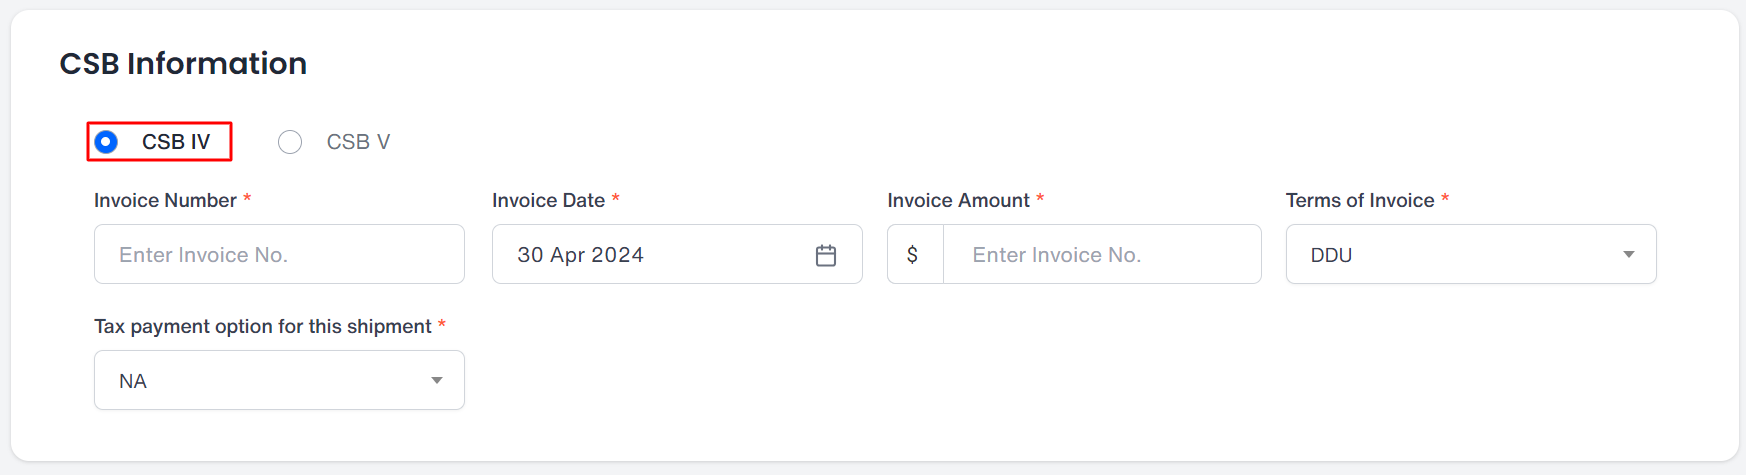
How to fill out the details in the ‘CSB (Courier Shipping Bill) Information’ section
There are 2 CSB brackets that your shipment can fall under. These are CSB IV and CSB V.
To learn further about which bracket your shipment will fall under, please refer to the following article:
https://www.ithinklogistics.com/blog/what-are-csb-4-and-csb-5-in-international-shipping/
CSB IV:
If your shipment falls into the CSB IV Bracket, then follow the steps below:
Select CSB IV. All the fields have been explained below in detail
- Invoice Number: Enter the Invoice number. The invoice will reflect the cost of the products purchased
- Invoice Date: Select the date from the invoice date
- Invoice Amount: Enter the Total Invoice amount
- Terms of Invoice: Select the option from the dropdown: either DDU (Delivered Duty Unpaid) or DDP (Delivered Duty Paid)
- Tax payment option for this shipment: Select the appropriate option from the drop-down list
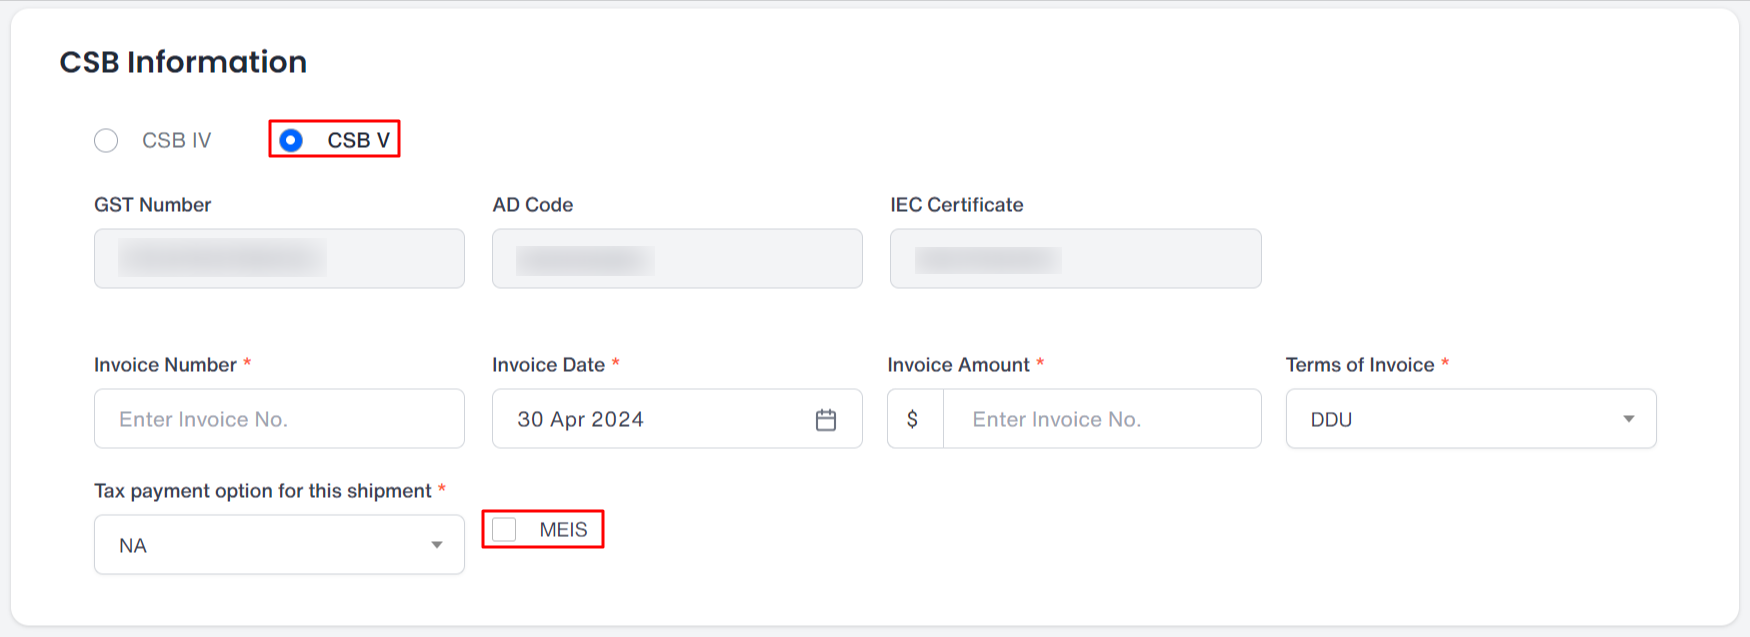
CSB V:
If your shipment falls in the CSB V bracket, the additional fields have been explained below in detail:
- GST Number: The GST number will be auto-fetched from the KYC section if you have entered those details previously, otherwise you will have to enter the GST Number Manually
- AD Code(Authorised Dealer Code): The Authorised Dealer code will also get auto-fetched from the KYC section. If not, you will have to enter it manually
- IEC certificate: The certificate number will get auto-fetched from the KYC section
- Invoice Number: It is the invoice's Unique ID.
- Invoice Date: It is the date that the invoice was generated
- Invoice Amount: This will be calculated automatically according to factors such as the product price & quantity.
- MEIS: Select the MEIS checkbox. MEIS stands for Merchandise Exports from India Scheme.
Note: This option appears only if CSB V is selected, and it is an optional value.
- The invoice terms are DDU (Delivered Duty Unpaid) & DDP (Delivered Duty Paid).